


After some delay, here is The missing Stuff, Guts & Video Episode 9, with more to follow shortly.
In editing it is often necessary to compare frames of video in a sequence, for color correction, matching clips shot at different times or with different equipment, adjusting filters or aligning visual elements in several clips. Final Cut Pro’s Frame Viewer tool makes makes these kinds of comparisons a snap. Here’s how it works.
Access the Frame Viewer by selecting it from the Tools Menu or use the Option-7 keyboard shortcut. The Frame Viewer appears as a tab within the Tool Bench window (see figure 1).
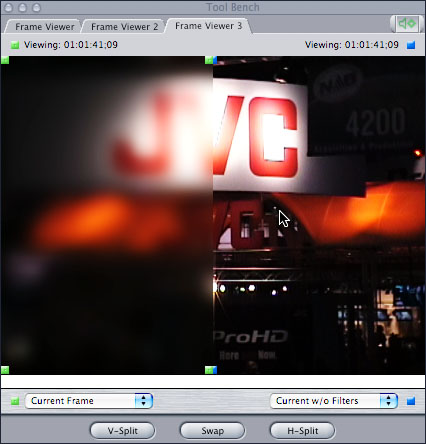
Figure 1: Frame Viewer showing two views of the same clip with a blur filter applied.
At the bottom of the Frame Viewer are two drop down menus that control what is displayed. The options for each drop down menu are (in order):
None – Select when split screen is not needed (Only available under the right drop down menu).
2nd Edit Back – Displays the frame two edit points to the left of the current frame (this will be the last frame of the second clip to the left unless the playhead is over the second clip in the sequence, then it will be the first frame of the first clip).
Previous Edit – Displays the frame one edit point to the left of the current frame (this will be the last frame of the clip to the left unless the playhead is over the first clip in the sequence, then it will be the first frame of the first clip).
Current Frame – Displays whatever frame the playhead is currently over.
Current w/o filters – Displays whatever frame the playhead is currently over before the filters are applied.
Next Edit – Displays the frame one edit point to the right of the current playhead location (this will be the first frame of the next clip to the right unless the playhead is over the last clip in the sequence, then it will be the last frame of the last clip).
2nd Edit Forward – Displays the frame two edit points to the right of the current playhead location ( this will be the first frame of the second clip to the right unless the playhead is over the next to the last clip in the sequence, then it will be the last frame of the last clip).
In Point – Displays the frame marked by an in point in the Timeline (if no In Points are set then it is the first frame of the sequence).
Out Point – Displays the frame marked by an Out Point in the Timeline (if no Out Points are set then it is the last frame of the sequence).
Use the drop down menus to select the frames to be compared. For example, when color correcting a clip, select Current Frame from the left drop down menu and Current w/o Filters from the right drop down menu (see figure 1). The Frame Viewer now displays a split-screen showing the the frame under the playhead with the color correction filter applied in the area defined by the green boxes on the left (the view within the green boundary is controlled by the left drop down menu), and the same frame without the color correction in the area defined by the blue boxes (the view in the blue boundary is controlled by the right drop down menu).
Say you want to align the horizon of two different clips or color match two different clips (both examples could be shot from different angles or different cameras), select Current Frame from the left drop down menu and Next Edit (if the clips are next to each other), and make the necessary adjustments to the clips (see figure 2).
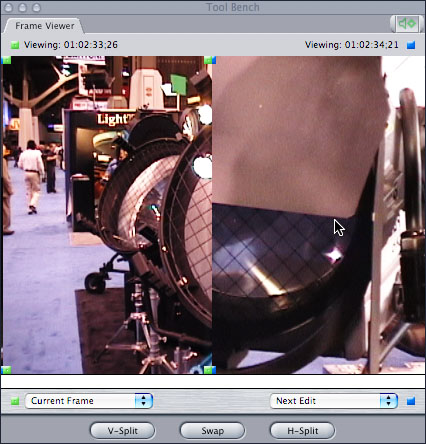
Figure 2: Frame Viewer showing frames from two different clips in a vertical split-screen.
The split-screen view can be modified by using the Split-Screen buttons at the bottom of the Frame Viewer. The V-Split button splits the view vertically (see figure 2), the H-Split button splits the view horizontally (see figure 3).
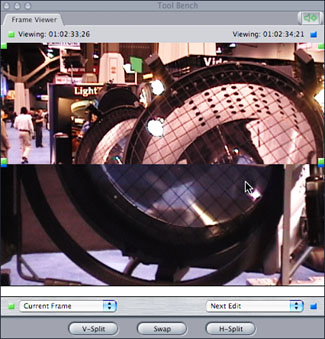
Figure 3: Frame Viewer showing two frames from different clips with a horizontal split-screen.
The Swap button switches the What is displayed in the blue and green boundaries. The boundary areas can also be adjusted by clicking and dragging on the green or blue boundary squares (see figure 4).
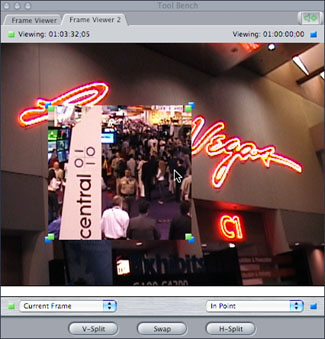
Figure 4: Frame Viewer showing frames from two different clips with the green boundary adjusted for a picture-in-picture view.
Check out the Frame Viewer when you get the chance and see how much it can help simplify adjusting clips.
Next episode will showcase the first tip for Final Cut Pro 6. See you then.

